This is a first for Quirkworthy as this article is written by someone other than me. The author, Ben Clapperton, was a fan of Tribes of Legend and had been eager to try out God of Battles. When he told me he’d written up one of his early games I offered to post the report here as he hasn’t got his own blog. I’ve tidied up the odd typo and added some footnotes to hopefully clarify a couple of points. Apart from that it’s all Ben’s work. He even supplied a few photos 🙂
Enjoy!
Armies and Deployment
This was my second game of God of Battles. The first had been played a few days previously and was mainly an exercise in learning the rules, so this was my first proper go at playing. Across the table was Graham, a familiar face from many games of another mass fantasy battle system, but this was his first experience of God of Battles. We played Undead vs T’lekkan at 24 points on the recommended 4’ by 4’ table size. As the table was actually another two feet wide we marked off one boundary with a river with the table edge serving as the other. Graham chose to take to battle with the T’lekkan on the grounds that they looked like they’d be easier to play, leaving me with the Undead.
I fielded a unit of Skeleton Warriors¹, an elite melee unit who would have to do much of the fighting against the hard hitting T’lekkan if I was going to survive their onslaught. With that in mind I bolstered them with an Undead Warhound, providing them with an additional Attack Dice, and added a Blacksoul, the elite warriors of the Undead legions. In total the unit would generate a hefty 12 Attack Dice on the charge. Next up was a Skeleton Horde, at 16 models which fight to the last skeletal man they make for a durable unit and one which I felt would be a good hiding place for a Necromancer. Character models cannot operate on their own and must either join a unit or ride a monster or chariot. Although the Skeleton Warrior unit is powerful I wanted it to get stuck in, which wouldn’t be conducive to the long-term survival of the Necromancer. Rounding out the army was a unit of Skeleton Archers and two units of Ghouls. The archers not only could try and thin out the T’lekkan hordes with arrow fire as they crossed the battlefield, but as a Formed Unit they also would allow me to use their Threat Zone to mess around with the movement of the opposing units. Though the Ghouls are neither hard hitting nor particularly durable, at three points apiece they offered me a couple of extra activations and hopefully more units than Graham could deal with at one time.
As a Necromancer comes with the Priest special ability, this gave me access to the Undead Miracles. Each army list (barring one) has eight Miracles and a Priest is randomly assigned three of them before the battle. It is possible to purchase more, but for simplicity’s sake I decided against this. Vutesh, my Necromancer’s god and Lord of the Underworld, saw fit to bless me with Look Around You (which forces an enemy unit to take a Test of Courage), Enfeeblement (a Curse which forces an enemy unit to re-roll their next set of successful melee attacks), and Paralysed With Fear (which marks an enemy unit as activated).
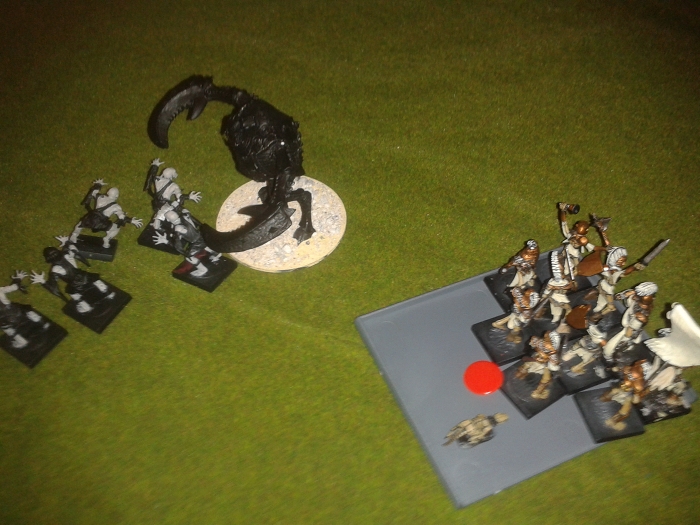
Lining up on the opposite side of the table was a small, but fearsome-looking force consisting of a unit each of T’lekkan Warriors, Black Warriors, and Princelings. There was no chaff in this army as all three are elite units in their own way; the Warriors in melee, the Black Warriors with their vicious Spit Acid ranged attack, and the mobile and surprisingly durable Princelings with their 14” movement, oh, and they can fly. If that wasn’t worrying enough they were backed up by the mighty Behemoth, a close-combat wrecking machine which at 24 points is the second most expensive model in the game, and in a 24 point game such as this it is the most expensive model that could be fielded.
We rolled off to see who the attacker and defender was, and although Graham managed to roll snake eyes it was still enough to make him the attacker against the placid² Undead. As the defender, this allowed me to place all of the terrain. On the centre left I put down a farmhouse with a walled enclosure, in front of it towards Graham’s deployment zone I placed a hill. Over on the right I placed a pair of woods next to each other with a marsh behind it towards my deployment zone. Once that was done, Graham was allowed to re-position or completely remove one piece of terrain. He contented himself with nudging the hill a half-centimetre along. After deployment, the Behemoth and Warriors held the centre of Graham’s line with the Princelings on his right flank and the Black Warriors towards the left.
Having set the farmhouse up on my left flank I then realised my slow moving units would be severely hindered if it got in their way so left my left flank open and placed all three skeleton units in the centre. I set up both Ghoul units on my right flank with the intention of breaking one of them through the woods and towards the T’lekkan camp and the easy 8 points it offered. The scenario we went for, “Day of Battle”, offered victory to the first player to reduce the opposing army to 18 points. In addition to our units, we each had a camp and a baggage train which were worth 8 and 4 points respectively whilst selections from the Command & Support section of the army list were not counted. This meant Graham got nothing if he killed the Necromancer or Blacksoul whilst if I managed to complete the Herculean task of removing the Behemoth I would get nothing for it! Both camp and baggage had to be set up against our own table edges and at least 2 feet apart so each ended up close to the corners.
Opening Moves
God of Battles utilises an alternating activation sequence in which the player with the initiative selects one of their unactivated units and does all its moving and fighting for the turn in one go, after which it is marked as activated and initiative is passed across the table. Once all units have been activated on both sides then the turn ends and a new turn begins. If a player has the initiative and has fewer units to activate than their opponent then they may choose to pass and hand the initiative back. Stratagems provide an additional wrinkle to the activation sequence, there are four of these and each turn a player may use any one of them. These allow for passing when you do not have fewer units to activate, unactivating a previously activated unit, activating two Formed units in a row, or marking an opposing unit as activated.
Each turn, initiative begins with the player who has the fewest units to activate, in this case that was Graham and he exercised his right to pass and sent it over to me. I started off by activating my Necromancer to call down some Miracles. This is the only time in which a Character activates separately from their unit, at all other times they simply move and fight when the unit does. Vutesh heeded my call to curse the Behemoth with Enfeeblement and to activate it with Paralysed With Fear. Graham then took it off using his stratagem, but activated the Princelings to fly them forward, allowing me to use my stratagem to activate it again. He moved the Black Warriors and the Warriors forward whilst I dashed both Ghoul units towards the woods and tentatively moved the skeleton units forward, not eager to meet the Warriors and Behemoth in the middle.
Graham kept the initiative at the start of the second turn. Seeing the threat to his camp that the Ghouls might pose he used his stratagem to mark one as activated and sent his Black Warriors to shower the other in acid. As they had to move to do it, they only got half dice with the result that only one Ghoul died. This was enough to force a Test of Courage³ as the remaining seven saw their comrade melt horribly into the earth, but fortunately they all stood firm. Initiative passed over to me and I eyed the Princelings nervously. Their next move would take them flying over the farmhouse and into my open left flank. Ahead of them would be my unprotected camp, to their right my unprotected flanks. Though I’d have preferred to mark the Behemoth as activated I used the stratagem on the Princelings instead to hold them in place for a turn and buy me some time. I did try and call on Vutesh’s aid to slow the Behemoth down, but he thumbed his nose at all my sacrifices this turn. The other Ghoul unit made a break for it past the Black Warriors whilst Graham moved both the Warriors and Behemoth their full movement towards the centre of the table. As the Behemoth trailed behind the Warriors thanks for being shut down the turn before I moved my Skeleton Warriors forward, hoping to deal with the T’lekkan Warriors before the Behemoth caught up.
Blood Flows
On turn three, Graham went on the attack, charging his Warriors into mine. As skeletons are Scary this meant they first had to take a Test of Courage before attacking. With their Morale of 10 there was little chance of them quivering before a unit of Skeletons but these proved to be particularly cowardly T’lekkan. I rolled a 12 on the Test of Courage and two of them fled before the fighting even started! The remaining eight failed to cause a single casualty leaving them open to the full force of my counter-attack, and a further T’lekkan bit the dust before they fell back to regroup. The Skeleton Warriors wouldn’t let them rest and charged straight after them, felling another one, but taking a casualty in return. I had hoped to wipe out the T’lekkan Warrior unit before the Behemoth arrived, but having failed to do so they now faced the prospect of an assault from both in the next turn. The Black Warriors then took aim again at the depleted Ghoul unit, but once again they stood firm, losing only a single casualty. Fearing these Ghouls were not long for this world I decided their best use was now as a human(-ish) shield and ran them over in front of the Skeleton Warriors. Having been held up a turn, the Princelings made their move towards my camp but I was ready for them. I diverted my Skeleton Horde to the left and pinned them in their Threat Zone. With the river marking the table edge directly behind the Princelings the only way out was to destroy the Horde. The other Ghoul unit carried on its merry way towards the T’lekkan camp to round off the turn.
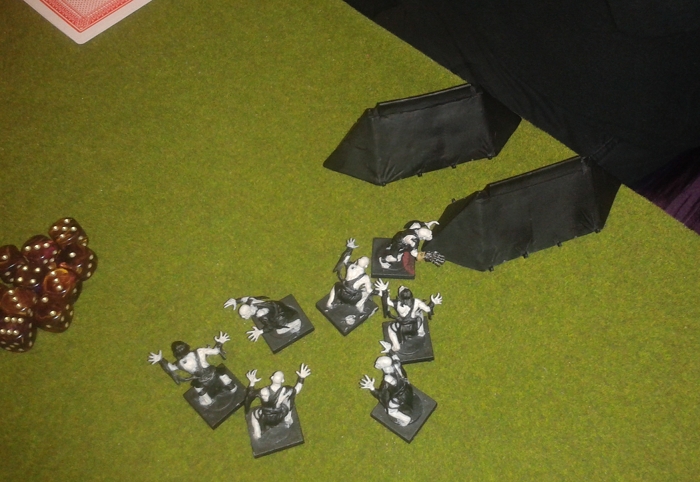
Turn four saw events take a decisive turn in the favour of the Undead. The Princelings charged in against the Horde and were sent packing with their tails between their legs. The Ghouls reached the camp with the Black Warriors in hot pursuit. The T’lekkan Warriors charged in at the Ghoul unit screening the Skeleton Warriors and though they didn’t do enough casualties to kill it, they did manage to get it out of the way. This then cleared a path for the Skeleton Warriors to charge in and destroy the T’lekkan unit. The Behemoth finally joined the action, thanks to the curse that had been hanging over him the first attack fizzled out. Sadly the same could not be said for the second lot of attacks a charging Behemoth gets. After receiving a wound that did nothing but annoy him he cleaned out a big chunk of skeletons.
A very one-sided fight in the offing as the behemoth rampages towards the ghouls.
Graham used his stratagem to activate the Behemoth a second time and this time took aim at the Ghouls, wiping them out and leaving him well placed to attack any of my three skeleton units. You might be asking why I haven’t mentioned the archers. That’s because they couldn’t hit a barn door.
The other unit of ghouls sneaks up on the T’lekkan camp.
Tents by Renedra, by the look of things.
The Ghouls sacked the T’lekkan camp on turn five as the camp followers decided not to defend it. Graham was now precariously close to defeat as either sacking his baggage train or killing either the Princelings or Black Warriors would win me the game. My chances of sacking the T’lekkan baggage as well as the Ghoul’s celebrations were both short-lived as they were melted under a hail of acid. I sent the Horde in against the Princelings who had taken to cowering by the river and another three fell, leaving them with just four in the unit. Normally this would be enough to break them but Princelings fight to the last, erm, Princeling. The Behemoth charged in at the skeletons, taking down six of them. Graham reactivated it with his stratagem and took down another five, leaving a just one alive. I sent the Skeleton Warriors in against the Black Warriors in the hope of delivering the coup de grace and winning the game, but the combat went disastrously against them and the whole unit fell!
The game was on the line as we started turn six. If my Skeleton Horde could clean out the last four Princelings before Graham could hunt down the last Skeleton Archer then I would win. If he got to the archer before I could take the Princelings down then the game was his. With that in mind he began by activating the Black Warriors and sending them towards the archer though they were still well out of range with their Spit Acid attack.
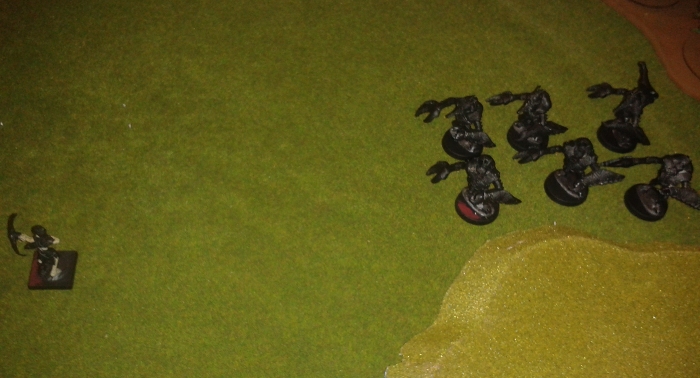
Black Warriors close in to Spit Acid on the last of the skeleton archers,
but they aren’t in range yet…
This was my chance, I piled in the Horde against the Princelings and three fell, one short!

The lone princeling survivor buys the T’lekkan some time.
Graham used a stratagem to reactivate the Black Warriors and this time they were in range. As the archer became a pile of melted bone the remainder of the Undead army chose to (un)live to fight another day and withdrew from the battlefield. Victory thy name be T’lekkan.
A thoroughly entertaining game ended with Graham snatching the tightest of victories, something which had looked unlikely just a couple of turns earlier with the extra mobility and quality of the T’lekkan units proving to be just enough in the end.

1: This unit has the wrong points cost in the book and so the army is not really right. Not Ben’s fault, but worth mentioning.
2: The undead aren’t really placid – they just want to be left alone to quietly plot their world domination to their own schedule.
3: Normally shooting attacks force recoils instead of TOCs. The TOC mentioned here is an additional special feature of the unpleasant Spit Acid ability.

For some reason I like written battle reports compared to the video ones. Perhaps it is because I am to old to be comfortable with video. However I like to think it is because I like the narrative potential of the written format. I also like the written format for reviewing the the report for any mistakes that were made because learning from other peoples mistakes is one of the reasons I find battle reports so interesting. I feel it is a obligation to study the details so I can be a worthy (devilish?) opponent that fully engages the person I am playing with.
Thanks for the effort that went into producing this and thanks for posting it.
I love written battle reports too.
Mainly because reading and talking about playing with toy soldiers is almost as fun as playing.And because if i was the kind of peson that woulld prefer a video report to a written rereport… I would probably play videogames instead of tabletop wargames. 😉
Omg! Terrible spelling! Sorry. 😦
“Thanks for the effort that went into producing this and thanks for posting it”
Thank you for reading it 🙂
The tents are from the Renedra. The T’lekkan baggage was a stone pen with some Saxons serving as T’lekkan dinner and for the Undead I’ve some Ral Partha tombs.
I read that battle report. I found it interesting. I was wondering what T’lekkan look like. I had imagined something like 40k Tyranids. I did visit the Foundry Miniatures web site and I was searching around for model kits named, “T’lekkan.” I wasn’t able to find anything like that. That is unfortunate. I would be interested to know where the T’lekkan models in the battle report pictures came from. I don’t recognize them.
They are the actual T’lekkan minis. The only ones you can’t see in the pics are the Warriors which look similar to the Black Warriors in the penultimate photo. I can take some photos of the minis and post them on the FB page if you want a closer look. There’s also plenty of photos of them in the rulebook too.
I’m under the impression (and someone please correct me if I’m wrong) that the major overhaul of the website is the reason that some of the GoB ranges aren’t available on there at the moment. The re-orginsation of the ranges seems to be affecting some of the availability as well, I’m impatiently waiting the release of the Ogre Gunners, but there were definitely some T’lekkan minis cast up for last week’s launch. If you want some and there are blisters left from that then it’d be worth giving Foundry a ring about it.
I’ve just been speaking to Marcus at Foundry and they are indeed in the process of changing their websites. They will be split into historical (due very soon) and fantasy (which will come after).
Having said that, they don’t want to stop anyone collecting an army and are very happy for people to either drop by the Foundry shop if they are local or to ring up and see what packs are available. All or very nearly all of the God of Battles models have been moulded now, and they’ll be happy to tell you what is on hand. They’re only a phone call away (0115 841 3000 from the UK).