Following on from yesterday, this is the first in a series about restic¹ and what I learn from my experiments with various means of cleaning up models made from it.
Before I start I’ve got some things that need covering, so you know where I’m coming from. If you have different experience or goals then you might want or get different results.
My aim here is not to tell you that restic is the best material ever, nor is it to say it’s the worst. I think those slots are already taken. Given that restic is a family of materials that is plainly going to be with us for some time I’m interested in learning how to deal with it. I’m sure that cannot be beyond the wit of man. Or even me, if I put my mind to it.
Speaking of me, what would I know? Well, despite not having finished painting a whole model in the last decade, I have been messing about with toy soldiers for a very long time. I’ve also worked with a lot of professional sculptors, manufacturers and painters and have interviewed quite a few of them over the years to pick their brains for various articles or my own interest. Over recent weeks I’ve decided to spend some effort getting back into modelling and painting, so I’m a funny combination of experience, knowledge and lack of practice. A veteran newbie, perhaps.
In the last fortnight I’ve prepped some non-restic models for this painting project. I’ve cleaned up an old GW Mordheim plastic, a new Perry War of the Roses plastic and a fiddly Rackham metal among others. This means that I have fresh experiences to compare with.
The restic models I’ll be using for these experiments are the latest batch of Mantic miniatures in the material. This is a slightly tweaked version of restic as Ronnie and the rest of the Mantic crew continue to refine the process. Most obviously, it’s a darker grey.
Now because I wrote Deadzone² I can occasionally do things like swan in and ask for some of the new and unreleased shiny toys to chop about. The models I nabbed were taken from the boxes in the warehouse that were waiting for the rest of the components to arrive so they could be packed and sent out to the Kickstarter backers. In other words, these weren’t samples cherry picked for quality, they were just the ones at the top of the first box we opened. It’s not all of the DZ models, but a fairly wide selection of the figures from several ranges.
So, where to start?
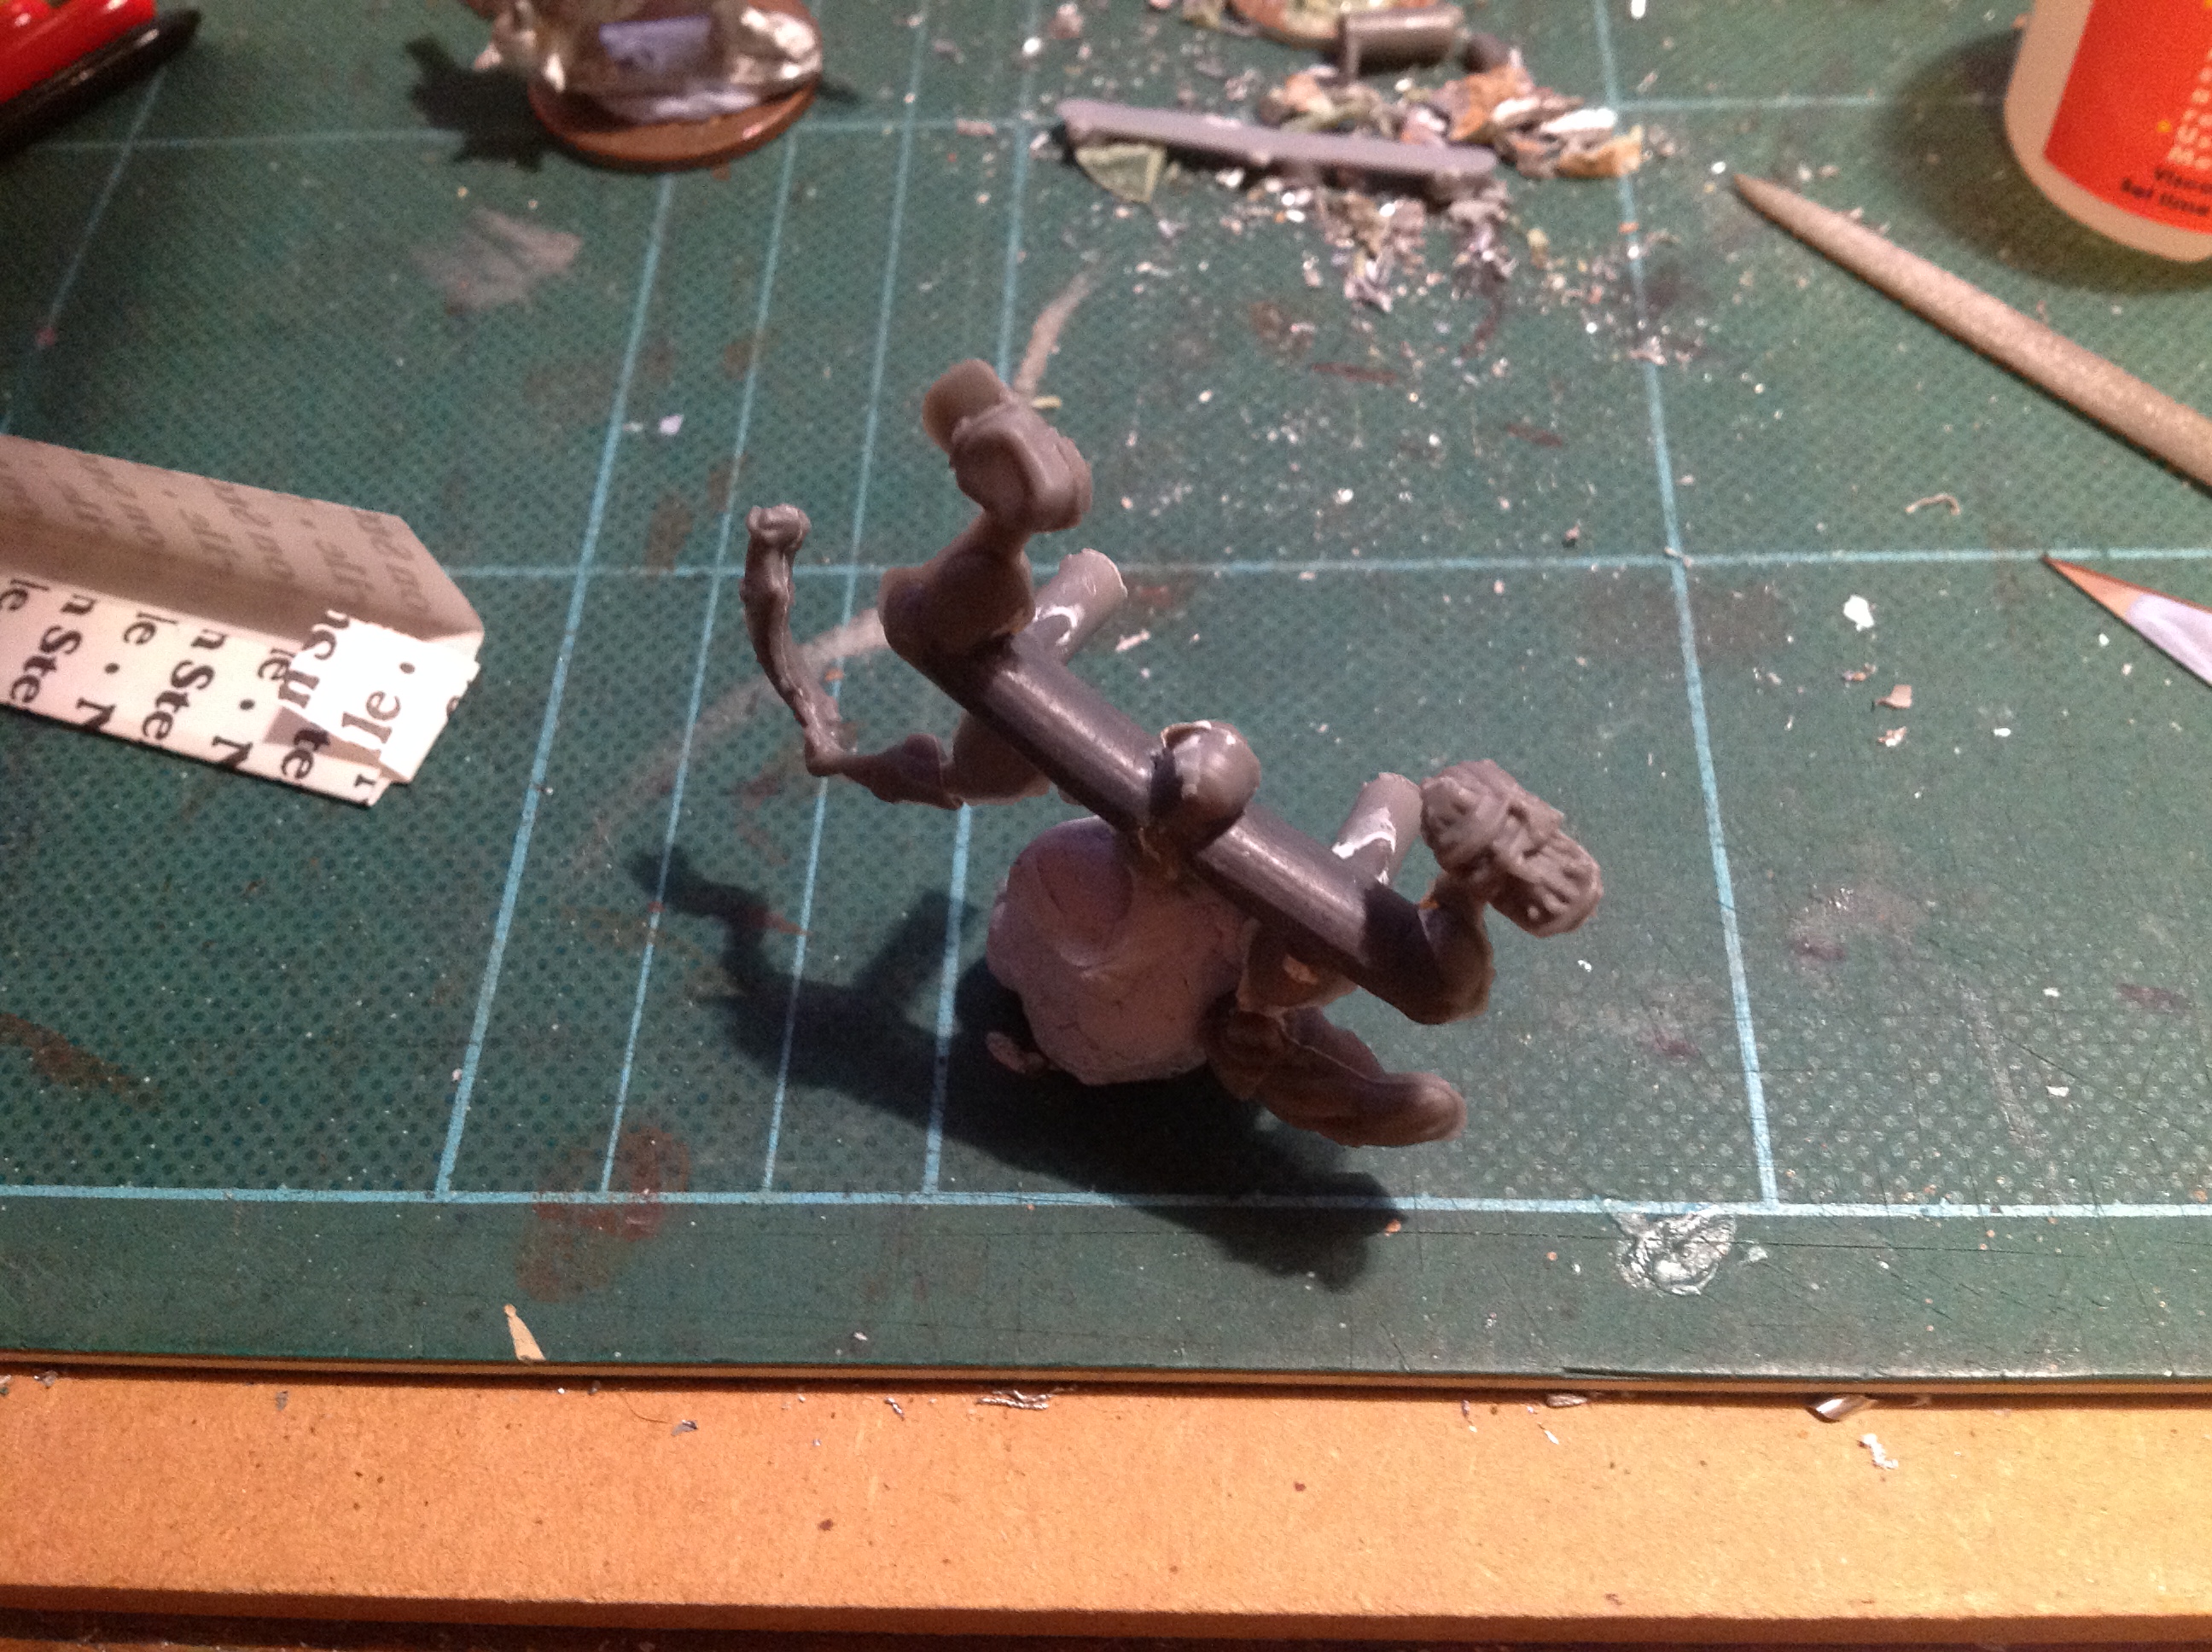
To keep things as simple as possible, I thought I’d pick a piece of sprue (some of the smaller pieces come on mini sprues). That, I reasoned, would be reasonably straight and smooth as a starting point and allow me to see the effects of my scraping and scrubbing without being distracted by whatever the model was actually trying to be. I also thought that I’d be best off picking the absolute worst bit of flash I could find as that would make my progress (or otherwise) most obvious. Happily these two coincided.
Oh, a word of warning. I’m going to leave these pictures very big so you can see everything really close up. That way you can really see what’s going on, warts and all. Remember though, that this is all way larger than real life.
So my first test subject is the worst case of flash I could find in over 200 pieces. Even this isn’t that terrible.

Strangely, and I’m not sure you can see this on the picture, the flash is worse on the sprue than the actual bits of model. Mind you, that’s just perfect for this test.
Before I show you what I did, just for reference, the body of the Orx that goes with this sprue (this is the pyro, by the way) had such subtle mould lines that it took me a minute to find them. Can you see the mould line here?

Eventually, with the help of raking light and several attempts I got a picture that shows it. I mean, it has to be there somewhere, right? Every model that comes out of a multi-part mould³ has mould lines.
Remember that this is larger than life size.

Spotted it? As you can see, it’s in the middle of the previous shot too. Most of the models I picked up were more like this than the sprue. I’ll show you some of the other ones later.
Cleaning Up
So, after asking for thoughts yesterday and trawling about the net looking for comments on the subject, I came up with a few generally received “facts” about cleaning restic.
- You need a very sharp knife to cut it cleanly.
- Scraping with a knife edge doesn’t work.
- Filing doesn’t work (though this was challenged yesterday in the comments).
So, I tried both knife and file. Taking one side of this sprue as a test, I cleaned one half with an old scalpel blade, first trimming away the bulk and then scraping with the edge. Then I filed the other side – no trimming back to start with, just filing away. I very quickly ended up with this:

Filing to the left of the central nub, scraping to the right. I thought I’d done a cleaner job than this, but then a great deal of magnification will make things look a bit ropey.
To make it a bit clearer I painted it. I tried ivory, but that wasn’t covering, so I switched to grey. The filed half is at the peaked cap end.
Now this looks perfect, even if I do say so myself. Whilst it was tempting to leave it like this, another angle makes my work look a bit less good.

So, what do I take from this? Quite a lot, actually.
- Cutting and scraping don’t need a new blade. This was done with an old one. I got a new one ready (as you can see in the bottom pic), but never actually fitted it. After I took it out of the packet I thought I should try with the duller blade just to see the difference, fully expecting to have all manner of problems and then change to the new one. Never needed to.
- Filing works fine. I never normally file stuff – don’t know why. I’m normally a devotee of the cutting and scraping school. The file I used was an old one I had lying about. As with the scalpel blade, I went with the old ones rather than my new tools so I had somewhere to go if they didn’t work. It came out better than my familiar scraping so I may need to try it a bit more.
- Just as easy as metal or plastic. Having read the horror stories I was fully expecting to have all manner of trouble. I had none. I wasn’t timing myself, but the experience of cleaning it was no different from cleaning metal or plastic. All have slightly different material properties and so need slightly different approaches, but only slightly. I never really like cleaning models, but there was nothing difficult or strange about this.
- The result is fine. Especially on the filed side. I think that my lack of skill is more responsible for any untidiness in the end result than the material itself. And, as I keep saying, remember that these pictures are bigger than life size. A more careful or experienced modeller shouldn’t have any trouble.
Whether this is a change in restic recipe (possible) my deft and cunning skill (doubtful) or something entirely different I don’t know. However, in this experiment, with this restic, I have to say that I honestly cannot see a problem.
Conclusion
I have to confess that I’m a bit perplexed. After hearing the horror stories I was genuinely surprised when it went so smoothly. I was expecting far more drama (and some swearage).
What was most striking was that it felt like cleaning anything else. It’s somewhere in hardness between hard plastic and old metal (not the nasty and tool-breakingly hard pewter). It’s far nicer to work with than I expected.
I am sure that someone will decide that these pictures are an example of the disastrous flashing on Mantic models and run about with their hair on fire. It always happens when I try something like this. If they do, then they’re missing the point. The worst example of flash I could find in over 200 pieces took no more time to clean than the same piece would in metal or plastic and can be cleaned with the same tools.
Next time I’ll try it on a whole model and see how that works. It’s the same material so I don’t see why it would differ, but you never know 🙂

1: Restic, in case you don’t know, is a term for a form of what is commonly called “resin-plastic”. It has the advantage of being relatively inexpensive to tool and produce when compared to both traditional hard plastic and white metal, which is why Mantic, Fantasy Flight, Privateer Press and others have invested in it. Restic isn’t one thing but many – a family of plastics that share some properties of resin – at least that’s what I’ve been told. I’m currently researching the exact chemical description.
What I am sure of is that you can change the properties of restic by varying its exact chemical composition, primarily with regard to how hard/bendy you want the end result to be. This has a bearing on all manner of production issues, most important of which for figures is that a degree of “give” allows for undercuts. This, in turn, allows models to be made that either could not be made in hard plastic or would have to be made in many more pieces. So there are advantages other than cost.
2: In case you are new to this blog, I am a professional game designer and have written several games for Mantic. I suppose that means that I have a vested interest in the models being nice. Perhaps. I definitely do have an interest in models that I want to use being nice, which is rather more where I’m coming from here. Plus, like I said earlier, restic isn’t going away anytime soon and whether it’s Mantic or FFG making it I want to know how to deal with the stuff.
3: That’s pretty much all of them. If someone tells you that a model has no mould lines then the chances are that they haven’t looked hard enough. They can be subtle, but they can’t be absent. Not in a multi-part mould.

That’s good to hear! The mold lines (or lack thereof) on the Pyro is nice to see. You can tell that some considerable effort has gone into making those improvements. I would be curious too see your thoughts on some of the older models that were produced for Dreadball, DKH, and KoW. Not just for you thoughts but as a side by side comparison.
Somewhere among the stacks I have some of the original DreadBall team boxes. I’ll dig one of those out and find a figure for comparison.
To clarify I was hoping you could compare how the older models clean up compared to the newer DZ models. Not their size in relation to each other. 🙂
Absolutely. That’s the plan. I’m just doing this in stages cos it takes so long and I’m kind of busy with everything else. First a test piece, then a new model or two, then once I’ve got the hang of that I’ll try an old model and see what the difference is. It’ll be fun 🙂
Hang on a second there old bean! Cleaning a bit of straight, and none detailed sprue is an entirely different kettle of antelope than cleaning say… a Dreadball Goblin Jacks flashed knobbly helmet!
I’d like to see you clean up a bit of detailed model with ease, without losing the detail before I believe that the problem has been solved 😀
Absolutely. As I said, full model next. However, starting with something simple is a demonstration to me, if no-one else, that the problem isn’t as bad as it has been.
In addition, having just been cleaning up armour on a hard plastic model, I can tell you that cleaning up pieces with rivets on isn’t easy in that either. That’s not so much an issue with the medium as how the mould lines run across the model.
Jimmi I hear what you are saying, however even this is a useful comparison. Super Dungeon Explore (by SodaPop) also uses a form of Restic and even on straighter pieces similar to what Jake has shown for his first trial, it is very easy to get burrs and furring.
On comparing that to Mantic’s Restic formula the Mantic one has been slightly easier for me to clean up. I like you will be very interested to see if the “new recipe” cleans up on higher detailed areas, but even this helps shed some light.
The TronTek 29’ers in the box set for instance are relatively smooth, so represent a similar test, but could burr/fur (until you got used to the material). With my SDE they nearly all tried to burr/fur even once I used to the material. Jake has come at this test from the standpoint of being new to the material and has no furring or burring. So it is valid and useful test for me anyway. 🙂
Thanks Bidge, glad it’s useful. Interesting to hear that SDE is similar. I’d guessed that it would be, though I haven’t had any in my hand to really tell. As I said earlier, it’s turning up everywhere so being able to deal with it is a useful skill to acquire.
As the title indicates, this isn’t the whole trial, just part 1.
Mantic’s restic has really improved as they’ve gotten better at it.
It’s gone from a cheap alternative to metal to a real material that has its own qualities. Compare The 3-hex models in DB to some of the early restic Warpath models and you’ll see the difference.
I’ve not got the early Warpath restics, but I take your point.
I still wake up screaming with memories of cleaning the Veer-myn from Project Pandora.
Counselling can help.
I agree with Jimmi. I’ve been scraping a Dreadball corp model this morning and spent an *hour* cleaning up just one outer thigh section. Each corp figure is taking me ~5 hours to clean up, but I am trying to do the best possible job, scraping out the indented detail in the armor plates and helmets. I find it excruciatingly difficult and will not be repeating this process with such care on my other teams (or Kings of War armies!). The rest will get sub-par cleanups so I can actually get around to *painting* before I die.
As I mentioned, I’ll see if I can find any of those original boxed team sets so that I know I’m using the older restic for comparison.
Personally, cleaning any model properly has always taken me quite a time. The more intricate (such as Rackham) the longer it takes.
Hang on a second… Did you say you’d spent an hour stroking the thigh of a Corp model? Wasn’t a female corp model by any chance, was it?
😉
Cleaning restic is not very easy except on the models with harsh lines like the Forgefathers. After leaving several marks with filing and cutting I now use a 9mm inch blade which I change about every other model. The Nameless and curvy models are especially hard to clean with a knife with minimal damage. An option is to play with the model’s heat (with cold water and-or hot water) till you find a confortable texture to work with because restic reacts strongly to heat variations. For filing I use a jeweler’s sand paper because regular files damaged DB models, the mold lines of which are not always the best placed (especially the Nameless and Veer-myn, sometimes at odd angles). Change your blade often because restic dulls it and you don’t want to mess up the little details.
I’ll see how I fare with a duller blade on the older restic. I was pleasantly surprised to find that it didn’t seem to have any issues with burrs and so on that I’ve read about with the older stuff.
I do have quite a few new blades to hand though, just in case 😉
You got lucky! I almost destroyed my Veer-Myn with the x-acto blade and had to use green stuff for repairs until I found the proprer way to deal with them… Oddly, the Teratons were much easier to clean and the mold lines intelligently placed so as to be near invisible. 🙂
Actually it depends, as always, on the quality of your tools.
Filing, I found out, is the easiest way to clean the restic models up, but you need a quality file. Cheap files will only ruffle the restic and cause more harm than everything else.
I am using clockmakers files and with them cleaning up is a breeze. They are expensive (approx. 15€ each) but they will last you a lifetime when handled properly. Preferrably you will get a set of half-round, triangular and round with teething 4 (or 6 for even finer details).
The file brand of my choice is Grobet-Swiss Vallorbe and you should get it from most clockmakers-supplies.
I have cleaned and painted about eighty Mantic restic pieces over the last year and a half or so. To illustrate the finish that I get (high tabletop standard if I do say so myself), this links to my Reek “Payback” Rolat DreadBall MVP:
http://sho3box.wordpress.com/2013/04/12/reek-payback-rolat-dreadball-mvp/
I find restic time consuming to work with and harder to get blemish free than traditional resin, metal or injection moulded “hard” plastic. I use the same battered old files that I have used for well over a decade and I scrape with a scalpel blade at a perpendicular angle as well as occasionally simply cutting an offending lump off. All of those process work for me with that material. All of those process work better for me with other materials, on a material by material basis.
I find cleaning up restic to be more tedious than doing the same job on other materials, but I get over it because 1) I want to play the games associated with those models, 2) because restic miniatures are cheaper to buy than miniatures made from other materials, 3) because its far more durable than metal for games that require a lot of miniature handling (like DreadBall) and 4) because its not going away any time soon Id say: its an adapt or die thing.
Jake, consider cleaning up multiples of the same or similar figures (like a DreadBall team) and see how you feel about the material then. I find that process tedious with all materials, but restic generates a unique brand of frustrated agitation in me, largely because none of my usual techniques work to the optimum level. Time for a move to decaf perhaps 😉
Nice paint job sho3box. I do feel a little queasy after looking closely at that green, but nicely rendered 😉
I’d rather not consider cleaning up lots of the same anything in any material. Cleaning models is possibly my least favourite aspect of the whole tabletop games hobby and I have been avoiding it for many years. Other people pay folk to paint armies for them – not me. I did, however, once pay someone to clean an army for me. Possibly why I never had duplicates in my armies (back when I did them).
All of which doesn’t really address your point. Cleaning up is tedious, but you find restic more tedious than other mediums. We’ll see how I get on when I move from test bench to whole models and how that compares with the older restic too.
Its Sleeps-too-close-to-unshielded-reactor Green with Printed-circuit-board-water-contamination Yellow highlights. Its the “new black” on Bubonica IV this season 😉
That’s what my eye surgeon tells me too.
Very nice paintjob you did. Nicer than mine, and it’s among one of my best. 🙂
I’ve got the new, darker restic but am yet to try it. From all accounts though (including yours now) it’s a much better material to work with and the mould lines are in much more convenient places.
The older light grey stuff is horrible to work with. It’s actually putting me off assembling the models I have which is shame, doubly so as I have so many of them.
It’ll be interesting to see what you think of the older restic formula having been introduced to the two flavours the opposite way round to a lot of us.
Indeed. I plan on getting a little familiar with the new stuff before I compare though. No point in bursting my bubble just yet 😉
Goo post Jake. I’ve some of the newer restics from Mantic. I think you should see if you can get your hands on some of the DB season 2 stuff to compare to, ideally the robots or z’zor. There you’ll find your heartache and swearage!
Found some of the first boxed teams. I thought they’d be a good comparison because they’re an older mix.
Will be interesting to see if there is a noticeable difference (or if the rest of us are just doing something wrong!) 😀
I don’t imagine for a moment that I have some secret ninja skills in this regard – I’m just posting up some experiments I think are interesting.
We know that the latest stuff is genuinely different from the first batches as Mantic have been working with the manufacturers to improve the workability of the stuff. As someone pointed out earlier, I am coming at this backwards compared to most people (starting with the new stuff), and maybe that will yield something useful. We shall see 🙂
I can 2nd (3rd,4th) the view that the latest wave is far better. In sculpting, moulding (lines in better places) and material. The first wave was awful prep wise. Leaving aside indifferent sculpting and bad mould line placement the material was a sod to clean. You blade would not be able to scrape smoothly and if you cut would quite often end up embedded in the model (metal for instance tends to guide it to the point of least resistance). Filing was difficult with occasionally ‘strips’ of material being pulled off akin to mistakenly pulling at that bit of skin next to your fingernail…
But yes, an improvement material wise. Still not metal or hard plastic (the latter being the gamers nirvana) but better than what has gone before.
Cleaning up a bit of rod is one thing, trying to clean a model without destroying the detail is another. I gave up trying to clean my Dreadball team – awful stuff to work with.
I haven’t really had a close eye in cleaning up the majority of the season 3 sculpts for dreadball yet. But certainly the earlier type did have the potential for being rather pants (Not finecast pants, but still pants).
I think the worst I personally had was my robots. -http://www.dakkadakka.com/gallery/497559-.html
Even after cleaning up, their bases still look awful.
The counselling helped but PTSD never really goes away….
Yeah i got fed up with cleaning up my robot team, hence it lies unfinished in my drawer.
This post makes me hapoy though.
One concern though is that jake has some models that should be in my delivery! 🙂
I struggled through and they’re done and primed they are such cool looking models the flash though was really ‘sticky’ and didn’t cut cleanly.
Yeah, it files up okay as long as the mould line placement is not terrible, running over chunks of detail (this happens basically all the time).
I find the warping to be far worse than the flash, the majority of my KoW KS mini’s thin bits are bent out of shape, swords are bent, arms are bent, spears are bent, horse halves are completely curved and do not fit together. Every single one requires individual hot water reshaping. Filing works, but takes longer than hard plastic due to the different material that tends to “go stringy” when you’re detailing with areas of detail. When you have 200+ minis it becomes such a chore.
Venting is an issue with the minis, often a vent will be in the middle of a face, or some other really bad location, destroying the detail. Also, sometimes the sprue gets twisted off badly at the factory, leaving a hole/divot in the miniature which has to be filled.
Another issue with restic is a pricing one. £15 for 10 minis is the typical price for restic. Games Workshop sells hard plastics at £18 for 10 with lots of options, lots and lots of them, you generally get nothing in Mantic restic kits, not even a couple of spare heads.
Also, on GW sprues you get better component variety, often 10 different legs/torsos, with Mantic you often only get 2 different legs/torsos in a kit and that’s it, so the models look very samey.
Additionally, superglue is a *far* less pleasant glue to work with than poly cement. It stinks, is more hazardous to health, doesn’t let you reposition while gluing.
So, no, I’m not a huge fan of restic. It can hold good detail and undercuts, that’s the only thing in its favour. It’s not so much one thing in particular that makes it bad, but a combination of lots of smaller annoying things. At the end of the day, it is an expensive material that is difficult to reshape and clean and does not have enough sculpt variety.
As for the material, it is injection-moulded PVC. 🙂
You’ve over looked one important element. Set up costs of Restic VS GW hard plastic
I (am no expert) believe that the set ups for resin are significantly lower than the set ups for hard plastic. Also, don’t forget about the years of industry experience that GW has over Mantic.
That said – I’m not apologising for Restic, so far I don’t like it. Yet I’m reserving final judgement based on my experiences with my Deadzone Minis
If you have a good hair-dryer reshaping is a matter of seconds and timing of the heating.
Also you are not supposed to inhale glue, both kinds of glues should not be inhaled bevause they are not healthy.
Very nice that you’re doing this. The 3rd season restic models were much easier to work with.
Veer-Myn team and the Void Siren faces (the mold line down the center of one of the sculpts) are a true test—as it’s not just the material but how the sculpts’ mold lines are positioned that have a big impact. I can certainly file the noses and fine details of equipment with ease but sculpting them back is not a simple. 🙂
Pingback: Mantic – “Restic”, Deadzone Rebs Strike Force, etc « pigment.apply
Late reply, but nowadays, if the mold line isn’t too obvious, I’ll just paint some Vallejo Plastic Putty (from the tube), brush-prime it, then go from there. I find it hard to tell if my cleaning up some plastic has really done the job, and sometimes painting up my first effort shows I don’t need to do more. Going back after priming for the occasional mini is still less work than making sure every mini is prepped correctly before priming. An engraving pen also helps file down mold lines.