As I said yesterday, I’ve been struggling to get some good pictures to go with this post. I’ve had another go, though they still aren’t much cop. Apologies for that. Either way, they’ll have to do for now. I’ve left them much bigger than real life so you can (hopefully) see what I’m on about. Please remember that these are really just 28mm models.
So, where to begin? The material is probably the best place. This isn’t “restic”. At least, it isn’t the same stuff that Mantic used for the DreadBall miniatures and which is often referred to as restic. They weren’t entirely happy with the end result, and so they’ve been tinkering. This material is related, but not the same. It’s a bit softer, to start with, and that makes it a little bendier. It’s still pretty firm, but the bendiness allows them to cast quite fine weapons (for example) without them breaking. You could cast this thinness in metal, hard plastic or hard resin, though it would probably snap pretty quickly in normal gaming use. This slight bendiness allows nice looking thin weapons to survive better. At least, that’s the idea.
But if this stuff isn’t restic, then what is it? Rather than get into the details of the chemical composition (which confuses me anyway), I’ve decided to give it a different made up name. I’m going to call it Rentonite. Mainly because it amuses me.
All the models in the box are made of Rentonite, so it didn’t really matter which I picked for this test. What was more important was finding something with an obvious mould line to clean away. This proved tricker than I had expected as the mould lines on the box models are very fine indeed and universally better than the ones I showed you before on the (already perfectly acceptable) Tiger Corps. Eventually, I picked the worst two I could find and got some starting photos. We can call them Mr Blue and Mr Red. Nobody wanted to be Mr Brown 😉

Mr Blue has a particularly obvious line on his upper right leg, so I decided to have a go at that. This was the worst mould line in the box, mainly because of its awkward placing and the fact that it goes over details.

Mr Red has a fine mould line all around. Caught it nicely in the sun.
Tools & Techniques
 The tools I used were these: a couple of files and a new scalpel blade. Nothing fancy. The files were old mid-price modelling files that had already seen a fair amount of use.
There are 3 approaches I wanted to try:
- Gently filing perpendicular to the mould line.
- Slicing thin slivers off the mould line with the deadly new blade.
- Scraping along the mould line with the side of the blade.
I’ve not been modelling for ages, so I’m a tad rusty at all of this. It might also be worth mentioning that in terms of preference I was always one for (3) scraping with a blade’s edge rather than (1) filing. At least, that was my usual approach for metal and hard plastic figures. Number 2 was never something I did routinely, but it had been suggested to me as an approach to try here, so that was added to the plan
I should also say that cleaning models was always my least favourite part of miniature gaming. Unfortunately I’m also a bit of a perfectionist, so I never would paint stuff that wasn’t just right…
In all cases, the detail on the models is quite shallow, so a light touch is required to avoid losing any of it in the cleaning process. I say this as a warning as I managed to clean off a bit I shouldn’t have done on Mr Red. Oops.
Now, who’s up first?
Mr Red
I’m not going to clean whole models for this demo, just selected parts. For Mr Red I chose his left side. I started out with a file on his combat trousers and bare arm. I guessed that it would work well on their smooth and organic shapes. Well, it kind of did.
It was quite tricky getting the files into all the nooks and crannies of the folds, even with a couple of different shapes. It did well enough on the raised bits though. The first few strokes make the Rentonite go very pale where its surface is damaged, and this colour change can be a little misleading. It also throws off a lot of micro-swarf, which gets in the way of seeing what you’re up to. As this is very light and possibly carries a little static charge, it tends to hang about more than it would with, say, metal. I quickly learned to use my fingers to wipe the rubbish off every couple of movements of the blade or file. This was better than just blowing it off as the natural oils from my fingers also tended to darken the surface again, which made it easier to see what was going on.
Even so, after a short while I’d filed down the raised areas to something like smooth, but not the hollows. For these I went in with the blade and with a combination of carving out and scraping away I cleared these too.
 As you can see, it’s hard to see what’s going on. So, after this I painted the bits I’d cleaned so I could see what the result was. Not as good as I’d hoped. The paint nicely showed up all the bits I’d missed. So, I had another go at cleaning, and then added another thin layer of paint.
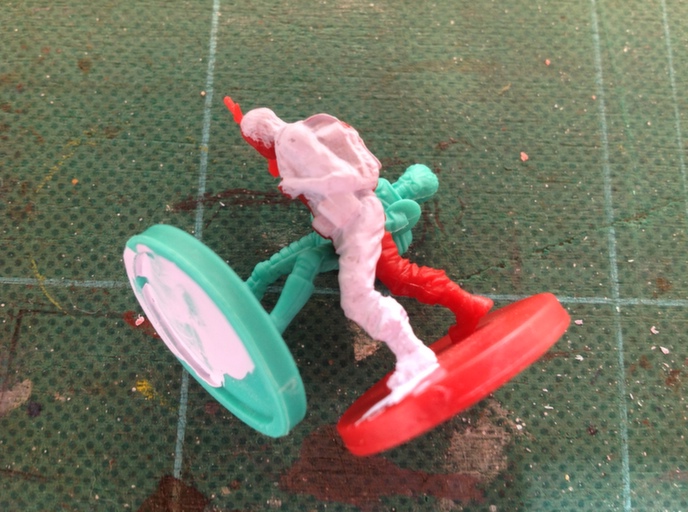
It’s annoyingly hard to see what I’ve done here. I probably should have picked a different colour. The real life result is a pretty smooth finish and no mould line. What might be mistaken for a bit of mould line under his forearm is, in fact, the light catching the gap between two ammo pouches.
Mr Blue
I focussed here on the model’s leg. This was more of a challenge than Mr Red as the mould line was in a tricky place to get to and was over a lot of detail. As with Mr Red, I ended up using a mixture of all 3 approaches, depending on the precise shape of the bit to be cleaned. There was the beginnings of a method here.
The design of the Martian’s suit includes a raised piece along the line of the leg, so you have to be careful not to trim this off in your excitement. The mould line here ran parallel to this, about 1mm to the right.
After some digging, scraping and shaving, I thought I’d got it about right, but was having trouble telling because of the colour change in the scraped bits.
 So, to clean things up, I gave it a thin coat of paint… and then saw all the bits that were still rough. That was mostly to do with the angle I could work at rather than a problem with the material, I think (that’s my excuse). I was trying to work in a bit of a hollow and was finding it tricky to get a smooth result with the tips of the tools. Scalpel blades and steel files don’t bend. The side of the boot turned out to be a perfect subject for the file – though again, be careful of the two fine seam lines that runs down the back of the boot. They’re supposed to be there!
Like Mr Red, the coat of paint gave me a guide as to what still needed work, and after a couple more goes I managed to make it presentable.
 The paint isn’t a uniform colour here, which makes it a bit less clear. Remember that there is supposed to be a raised line down the outside of the thigh. The fiddly area that took all the work is the bit above this in the photo. I know – it’s hard to see. You can tell that the boot’s nice and smooth though 🙂
Conclusion
Apologies again for the photos. I need a lot more practice there. I hope they’re of some use though.
Rentonite is very soft when you’ve got a scalpel blade to work it with. You can quickly remove pouches, weapons or whole limbs if you feel the need. This makes carving off whatever you don’t want very easy.
Filing and scraping are a bit messy and take a lot of stopping and checking to make sure you haven’t gone too far. Filing is very quick if you have something like the smooth side of a Martian’s boot to do.
Overall I ended up using a mix of all three approaches, as each had advantages over the others depending on the shape of the bit to be cleaned. Mostly this process ended up being an initial filing of the big, smooth areas and then using the blade in whatever way worked best to tidy up the edges and the details.
You could do the whole thing with the blade if you chose. The danger here is cutting facets into something that should be rounded – something that files avoid more easily.
So there you have it – my first adventure in cleaning up Rentonite. It didn’t seem particularly slow to work with, nor especially problematic. Like every other medium people make models in, you have to learn its properties. Beyond that I can’t say there are any real problems to report.

Rentonite… like cryptonite ?!
Anyway we can see the mould line, does it go away easily with the scaplel, like with restic ?
Easier, I’d say. The main problems I had were (a) my unfamiliarity with the stuff, and (b) the awkward place I was trying to get to. That would have been a pain in any medium.
Mantic said Mars Attacks minis would be like Gears of War minis, I cleaned them up and it was a pain in the ass for some of them (but they were rather hard plastic).
Was the comparison only around detail ?
It feels like a similar sort of stuff to GoW, though I never tried cleaning any of those up to compare directly.
Pingback: Mars Attacks Miniatures – Part 3 |